QEMU Virtual Machine Optimization
2018.07.15 | Yuki ReaThere are many ways of fine tuning QEMU virtual machine performance. This monolithic article contains a variety of methods to optimize and improve VM performance for different types of applications. While this article is specific to Debian 9 and QEMU, it can easily be adapted to work for other Linux distributions and applications.
Terminology
- Bare-Metal
- Host
- Thread
- CPU thread
- vCPU thread
A physical computer system and the base level operating system running on it.
A bare-metal machine that virtual machines are run on.
A core or SMP/Hyperthreaded core of a CPU.
A thread on the host system CPU.
A thread on a virtual machine's virtualized CPU.
CPU Isolation
Isolating a VM's vCPU threads from the host system ensures that processes on the host system can not effect the performance of isolated VMs. This can be set at boot time with the static kernel parameter
Isolating QEMU Threads From Host Processes Using "isolcpus"
Using
Edit /etc/default/grub adding the isolcpus=[list] kernel parameter to the GRUB_CMDLINE_LINUX_DEFAULT variable.
/etc/default/grub
 1 # If you change this file, run 'update-grub' afterwards to update
 2 # /boot/grub/grub.cfg.
 3 # For full documentation of the options in this file, see:
 4 #   info -f grub -n 'Simple configuration'
 5
 6 GRUB_DEFAULT=0
 7 GRUB_TIMEOUT=0
 8 GRUB_RECORDFAIL_TIMEOUT=$GRUB_TIMEOUT
 9 GRUB_DISTRIBUTOR=`lsb_release -i -s 2> /dev/null || echo Debian`
10 GRUB_CMDLINE_LINUX=""
11
12 # specify individual threads
13 GRUB_CMDLINE_LINUX_DEFAULT="quiet intel_iommu=on isolcpus=8,9,10,11,12,13,14,15,24,25,26,27,28,29,30,31"
14 # or specify a range of threads
15 GRUB_CMDLINE_LINUX_DEFAULT="quiet intel_iommu=on isolcpus=8-15,24-31"
Save and close the file then run update-grub to update grub.
Reboot and run a system monitor like
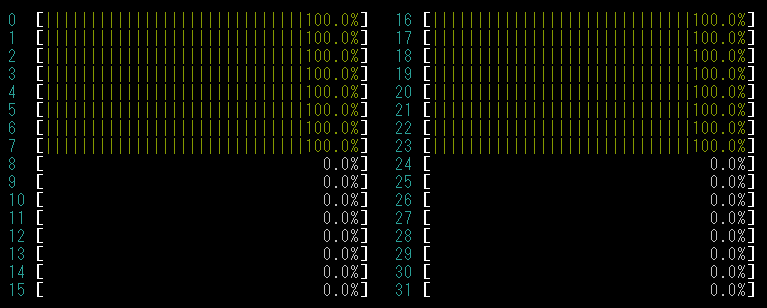
Each QEMU vCPU thread needs to be manually bound to an isolated CPU thread, use
Dynamically Isolating QEMU Threads From Host Processes Using "cset shield"
First create a shield, do this by running the following command/s.
1 # specify individual threads
2 cset shield -c 8,9,10,11,12,13,14,15,24,25,26,27,28,29,30,31
3 # or specify a range of threads
4 cset shield -c 8-15,24-31
5 # move all movable kernel threads off of the shield
6 cset shield --kthread on
QEMU can be started either by using
cset shield --exec qemu-system-x86_64 -- -$OPTS
Alternatively, add already running PID/s to the shield like so.
cset shield --shield --threads --pid $(pidof qemu-system-x86_64)
It may be desirable to disable the shield to allow the host to share CPU resources with the VM again at certain times. This will/should not cause the VM to pause or terminate. Do this by using the following command.
cset shield --reset
Dynamically Isolating QEMU Threads From Host Processes Using "cpuset / cgroups"
First create the following cpusets using the following commands like so.
 1 # create a cpuset called "system" for all other processes running on the host system
 2 mkdir /sys/fs/cgroup/cpuset/system
 3 # set cpuset.mems to the memory nodes which processes in the "system" cpuset should have access to
 4 echo 0-1 > /sys/fs/cgroup/cpuset/system/cpuset.mems
 5 # specify which cores are available to the "system" cpuset (first 7 cores on the first numa node and their SMP threads)
 6 echo 0-6,16-22 > /sys/fs/cgroup/cpuset/system/cpuset.cpus
 7
 8 # create a cpuset called "qemu-virt" for the QEMU parent process and all of it's worker processes
 9 mkdir /sys/fs/cgroup/cpuset/qemu-virt
10 # set cpuset.mems to the memory nodes which processes in the "qemu-virt" cpuset should have access to
11 echo 0-1 > /sys/fs/cgroup/cpuset/qemu-virt/cpuset.mems
12 # specify which cores are available to the "qemu-virt" cpuset (last core on the first numa node and it's SMP thread)
13 echo 7,23 > /sys/fs/cgroup/cpuset/qemu-virt/cpuset.cpus
14
15 # create a cpuset called "qemu-vcpu" for QEMU vCPU processes
16 mkdir /sys/fs/cgroup/cpuset/qemu-vcpu
17 # set cpuset.mems to the memory nodes which processes in the "qemu-vcpu" cpuset should have access to
18 echo 0-1 > /sys/fs/cgroup/cpuset/qemu-vcpu/cpuset.mems
19 # specify which cores are available to the "qemu-vcpu" cpuset (the entire second node)
20 echo 8-15,24-31 > /sys/fs/cgroup/cpuset/qemu-vcpu/cpuset.cpus
Next move all processes from the
1 # copy all PIDs in the "root" cpuset to "system" cpuset
2 cat /sys/fs/cgroup/cpuset/tasks | xargs -n1 -i echo {} > /sys/fs/cgroup/cpuset/system/tasks
3 # clear all PIDs from the "root" cpuset
4 echo > /sys/fs/cgroup/cpuset/tasks
Now move the QEMU parent PID into the
 1 # NOTE:
 2 # "$NAME" is a variable we set to differentiate VMs from each other on the host system. It should be identical to the "-name" qemu argument
 3 # for the "for" loop to work and to differentiate QEMU vCPU threads from other threads, it is necessary to add the '-name $NAME,debug-threads=on' QEMU argument
 4
 5 # move QEMU parent PID into the "qemu-virt" cpuset
 6 echo $(pstree -pa $(pidof qemu-system-x86_64) | grep $NAME | awk -F',' '{print $2}' | awk '{print $1}') > /sys/fs/cgroup/cpuset/qemu-virt/tasks ;
 7 # create a counter and set it to 0
 8 HOST_THREAD=0
 9 # for every QEMU vCPU PID
10 for PID in $(pstree -pa $(pstree -pa $(pidof qemu-system-x86_64) | grep $NAME | awk -F',' '{print $2}' | awk '{print $1}') | grep CPU |  pstree -pa $(pstree -pa $(pidof qemu-system-x86_64) | grep $NAME | cut -d',' -f2 | cut -d' ' -f1) | grep CPU | sort | awk -F',' '{print $2}')
11     do let HOST_THREAD+=1
12     # add QEMU vCPU PIDs to "qemu-vcpu" cpuset
13     echo $PID > /sys/fs/cgroup/cpuset/qemu-vcpu/tasks
14 done
Removing the cpusets and returning the system back to normal is just like before but in reverse.
 1 # copy all PIDs in the "system" cpuset to "root" cpuset
 2 cat /sys/fs/cgroup/cpuset/system/tasks | xargs -n1 -i echo {} > /sys/fs/cgroup/cpuset/tasks
 3 # remove PIDs from the "system" cpuset
 4 echo > /sys/fs/cgroup/cpuset/tasks
 5 # remove the "system" cpuset
 6 rmdir /sys/fs/cgroup/cpuset/system
 7
 8 # copy all PIDs in the "qemu-virt" cpuset to "root" cpuset
 9 cat /sys/fs/cgroup/cpuset/qemu-virt/tasks | xargs -n1 -i echo {} > /sys/fs/cgroup/cpuset/tasks
10 # remove PIDs from the "qemu-virt" cpuset
11 echo > /sys/fs/cgroup/cpuset/tasks
12 # remove the "qemu-virt" cpuset
13 rmdir /sys/fs/cgroup/cpuset/qemu-virt
14
15 # copy all PIDs in the "qemu-vcpu" cpuset to "root" cpuset
16 cat /sys/fs/cgroup/cpuset/qemu-vcpu/tasks | xargs -n1 -i echo {} > /sys/fs/cgroup/cpuset/tasks
17 # remove PIDs from the "qemu-vcpu" cpuset
18 echo > /sys/fs/cgroup/cpuset/tasks
19 # remove the "qemu-vcpu" cpuset
20 rmdir /sys/fs/cgroup/cpuset/qemu-vcpu
CPU Affinity
It is important to have system architecture in mind when creating high performance, low latency virtual machines. Optimizing which CPU threads a VM utilizes in relation to the host system's architecture can result in significant improvements. Ensuring that VMs are allocated CPU threads that are on the same node or in the same compute module can dramatically decrease latency spikes and improve overall performance.
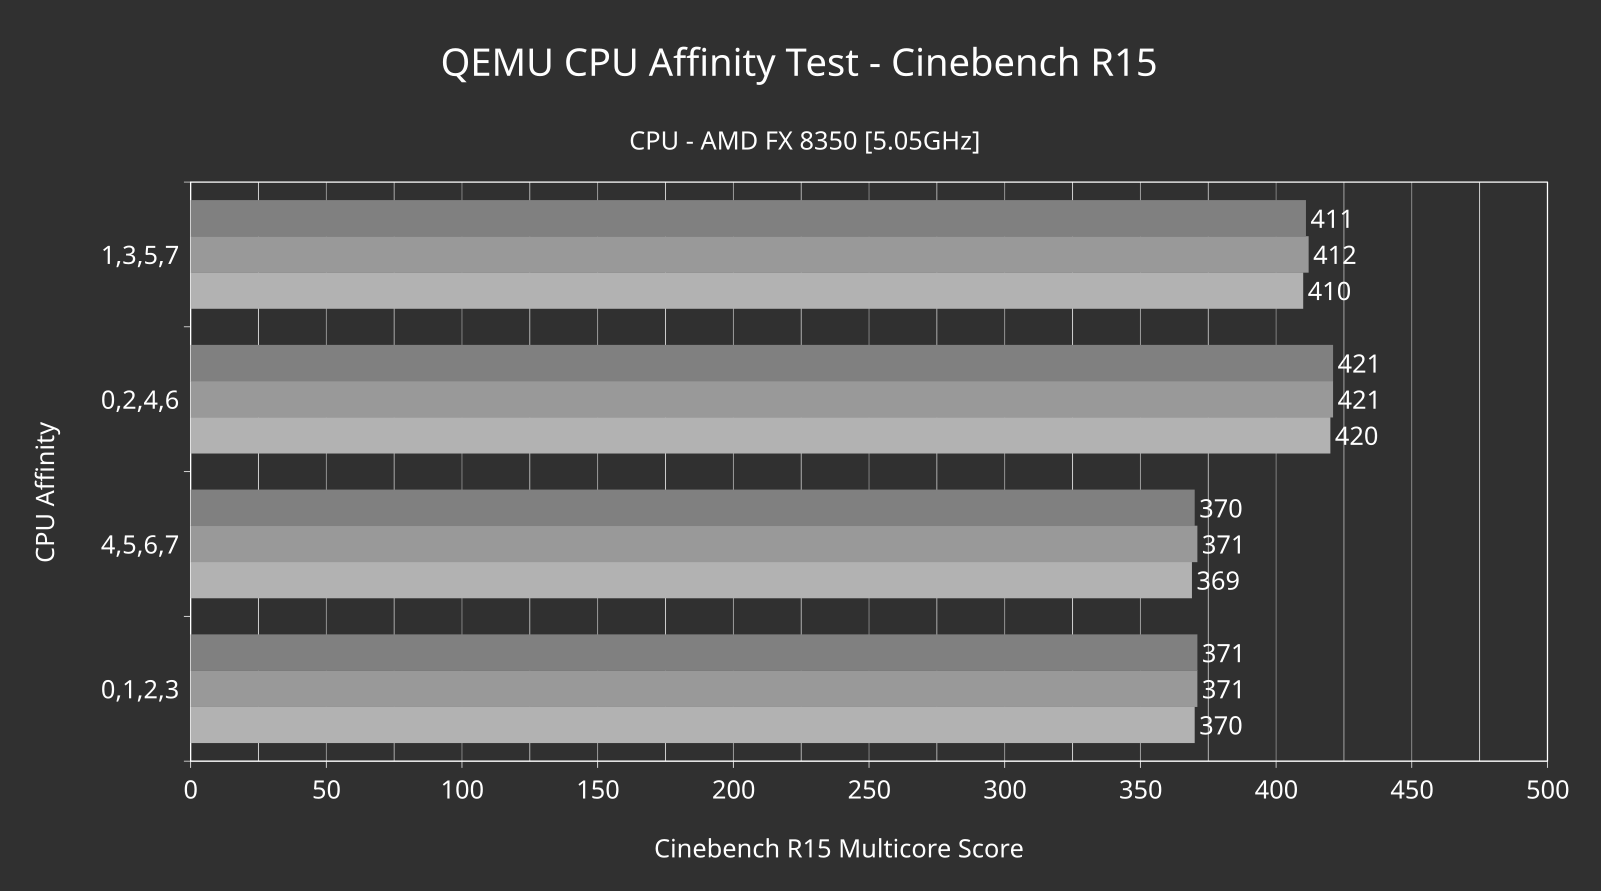
A perfect example of when optimizing a VM for a specific CPU architecture results in significant performance gains is the AMD FX line of CPUs. They feature a unique architecture which also happens to be one of their major downfalls. The AMD FX 8xxx/9xxx series processors consist of 4 compute modules, each with 2 integer cores that have their own level one(L1) cache. Although each integer core has its own L1 cache, they have to share the fetch and decode stages of each cycle, a single L2 cache module, and a single floating point unit(FPU). These shared resources mean that one integer core may have to wait for the other in certain circumstances. By setting a VM's CPU affinity to a staggered arrangement, each vCPU will be in a different compute module on the host CPU. This means each vCPU has access to its own L2 cache and FPU on the host CPU giving the VM access to twice the L2 cache and FPUs as it would otherwise have when using a sequential CPU affinity.
Below is the test results from a 4 core VM on a host system with a 5 GHz AMD FX 8350 CPU running Debian 9.1. The guest is a Windows 10 VM with networking disabled so that Windows update can not impact the test results. You can see that using cores (0,2,4,6) instead of (0,1,2,3) nets a 13.5% improvement.
Using "taskset" to Set CPU Affinity
This method requires no modifications to QEMU itself which can be good if you want to get QEMU updates from your distribution's software repository as opposed to patching and re-compiling QEMU from source every time you decide to update it. This is a simple shell script which uses the debug-threads QEMU argument and taskset to find vCPU threads and pin them to an affinity variable set elsewhere in the script.
 1 #!/bin/bash
 2
 3 # clear options
 4 OPTS=""
 5
 6 # set vm name
 7 NAME="PARASITE"
 8
 9 # host affinity list
10 THREAD_LIST="8,9,10,11,12,13,14,15,24,25,26,27,28,29,30,31"
11
12 # qemu options
13 OPTS="$OPTS -name $NAME,debug-threads=on"
14 OPTS="$OPTS -enable-kvm"
15 OPTS="$OPTS -cpu host"
16 OPTS="$OPTS -smp 16,cores=8,sockets=1,threads=2"
17 OPTS="$OPTS -m 32G"
18 OPTS="$OPTS -drive if=virtio,format=raw,aio=threads,file=/vms/disk-images/windows-10.img"
19
20 function run-vm {
21 # specify which host threads to run QEMU parent and worker processes on
22 taskset -c 0-7,16-32 qemu-system-x86_64 $OPTS
23 }
24
25 function set-affinity {
26 # sleep for 20 seconds while QEMU VM boots and vCPU threads are created
27 sleep 20 &&
28 HOST_THREAD=0
29 # for each vCPU thread PID
30 for PID in $(pstree -pa $(pstree -pa $(pidof qemu-system-x86_64) | grep $NAME | awk -F',' '{print $2}' | awk '{print $1}') | grep CPU |  pstree -pa $(pstree -pa $(pidof qemu-system-x86_64) | grep $NAME | cut -d',' -f2 | cut -d' ' -f1) | grep CPU | sort | awk -F',' '{print $2}')
31 do
32     let HOST_THREAD+=1
33     # set each vCPU thread PID to next host CPU thread in THREAD_LIST
34     echo "taskset -pc $(echo $THREAD_LIST | cut -d',' -f$HOST_THREAD) $PID" | bash
35 done
36 }
37
38 set-affinity &
39 run-vm
Memory Tuning
Memory, or RAM, can have a large impact on VM performance, especially with certain system architectures that are memory speed and latency sensitive. Preallocating memory for your VM and increasing the memory page size will help reduce memory access latencies and increase overall VM CPU performance.
Preallocated Memory
Preallocating memory is one of the easiest ways to improve VM performance. This setting does exactly what it says, it dedicates and area of memory that is the entire size of the guest VM's memory so that new blocks of memory do not have to be allocated by the host as the guest requests them. This does however leave all memory preallocated to the VM unusable by the host until the guest is halted.
Preallocated memory can be enabled with one QEMU argument. -mem-prealloc
Hugepages
A page is a chunk of system memory (usually 2 or 4KB in size) that a CPU allocates and indexes so that it can be accessed again when needed. Since the operating system and CPU need to keep this index of where each page is located in physical memory, having many small pages increases the total amount of entries in the index and therefore increases the time to look up each entry. Hugepages are used to increase the size and decrease the total number of pages which lowers the time it takes to look up a page in memory.
There are a few steps to enable and use hugepages for your QEMU VM. Start by determining the page sizes that the host CPU supports. Do this by running the following script:
1 if [ "$(cat /proc/cpuinfo | grep -oh pse | uniq)" = "pse" ]
2 then echo "2048K = OK"
3 else echo "2048K = NO"
4 fi
5 if [ "$(cat /proc/cpuinfo | grep -oh pdpe1gb | uniq)" = "pdpe1gb" ]
6 then echo "1G = OK"
7 else echo "1G = NO"
8 fi
It is recommended to use the largest supported hugepage size for the best performance. Edit /etc/default/grub and add the hugepagesz=[size] and default_hugepagesz=[size] kernel parameters. These parameters set the size of each hugepage.
 1 # If you change this file, run 'update-grub' afterwards to update
 2 # /boot/grub/grub.cfg.
 3 # For full documentation of the options in this file, see:
 4 #   info -f grub -n 'Simple configuration'
 5
 6 GRUB_DEFAULT=0
 7 GRUB_TIMEOUT=0
 8 GRUB_RECORDFAIL_TIMEOUT=$GRUB_TIMEOUT
 9 GRUB_DISTRIBUTOR=`lsb_release -i -s 2> /dev/null || echo Debian`
10 GRUB_CMDLINE_LINUX=""
11 GRUB_CMDLINE_LINUX_DEFAULT="quiet hugepagesz=1G default_hugepagesz=1G"
Save and close the file then run update-grub to update grub. A reboot will be necessary for changes apply.
Hugepages can be allocated dynamically during runtime by echoing a number of hugepages to a file. To allocate hugepages to all nodes, echo the number of hugepages to allocate to /sys/kernel/mm/hugepages/hugepages-[size]/nr_hugepages. To allocate hugepages to a specific node, echo the number of hugepages to allocate to /sys/devices/system/node/node[number]/hugepages/hugepages-[size]/nr_hugepages instead.
1 # allocate hugepages to the entire system's memory pool
2 echo 16 > /sys/kernel/mm/hugepages/hugepages-1048576kB/nr_hugepages
3
4 # allocate hugepages to a specific node
5 echo 16 > /sys/devices/system/node/node1/hugepages/hugepages-1048576kB/nr_hugepages
Remove hugepages by echoing 0 instead to the same file.
Use the -mem-path /dev/hugepages argument when starting QEMU to enable the use of hugepages.
Linux Process Scheduler Tuning
There are a few different ways of tuning the Linux process scheduler to reduce latency spikes and increase overall CPU performance. Most of these require using a real-time kernel or compiling a custom kernel to enable these features.
SCHED_FIFO Real-Time Process Priority
The
Set QEMU to the
1 # NOTE:
2 # "$NAME" is a variable we set to differentiate VMs from each other on the host system. It should be identical to the "-name" qemu argument
3 # it is necessary to wait until QEMU has finished booting an OS before changing to a real-time process priority or it will halt virtual disk access
4
5 # get parent PID of QEMU VM
6 PARENT_PID=$(pstree -pa $(pidof qemu-system-x86_64) | grep $NAME | cut -d','  -f2 | cut -d' ' -f1)
7 # set all threads of parent PID to SCHED_FIFO 99 priority
8 pstree -pa $PARENT_PID | cut -d','  -f2 | cut -d' ' -f1 | xargs -L1 echo "chrt -f -p 99" | bash
sched_rt_runtime_us
Set this parameter during runtime using the
1 # set to -1 to disable
2 sysctl kernel.sched_rt_runtime_us=-1
3 # or increase the value
4 sysctl kernel.sched_rt_runtime_us=980000
Linux Kernel Tuning
Configuring and compiling a custom Linux kernel may be necessary for low latency virtualization if using the real-time kernel from your distribution's software repository is not good enough for your application.
CONFIG_PREEMPT_RT Real-Time Kernel Patch
The
Try downloading the latest real-time kernel and it's source code from your distribution's software repository. If your distribution does not provide a real-time kernel or a newer version is desired, patching a vanilla kernel will be required.
Start by downloading a copy of the Linux kernel source code and a matching real-time kernel patch, in this case linux-4.16.18.
Downloads/4.16.18/
1 gunzip linux-4.16.18.tar.gz
2 tar xvf linux-4.16.18.tar
3
4 gunzip patch-4.16.18-rt12.patch.gz
Move the patch into the Linux kernel source directory and then
Downloads/4.16.18/
1 mv patch-4.16.18-rt12.patch linux-4.16.18/
2 cd linux-4.16.18
Apply the patch with the
Downloads/4.16.18/linux-4.16.18/
1 patch -p1 < patch-4.16.18-rt12.patch
Copy the configuration for your existing kernel into the kernel source directory.
Downloads/4.16.18/linux-4.16.18/
cp /boot/config-`uname -r` .config
Use the menu configuration utility to enable the
Downloads/4.16.18/linux-4.16.18/
make menuconfig
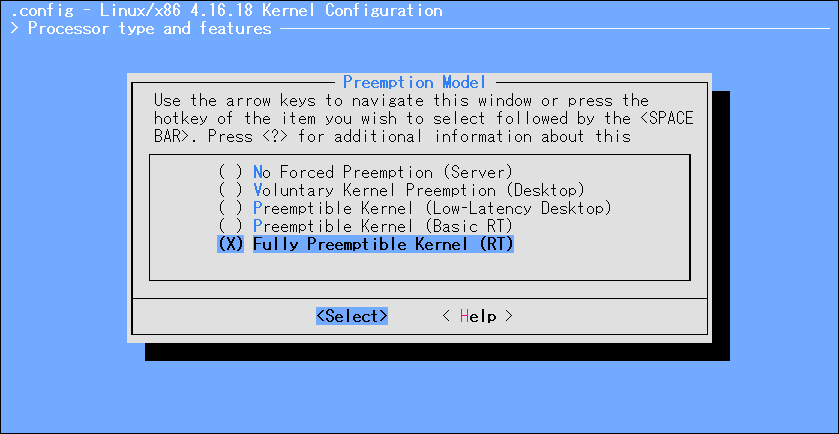
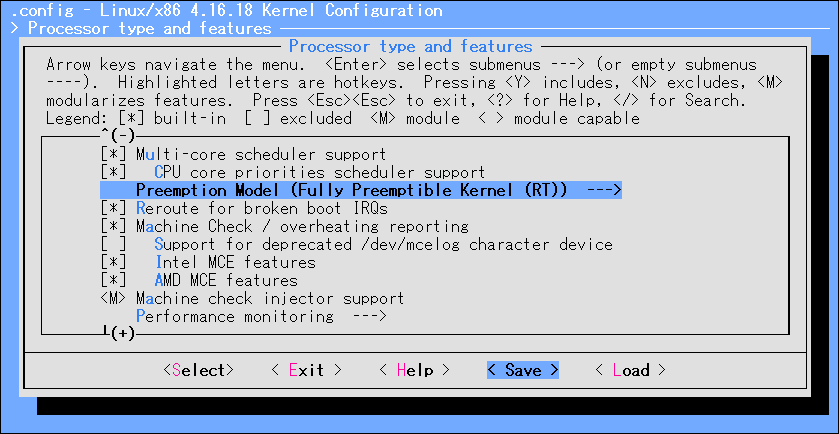
These options can be found in the following menu tree of the kernel configuration:
Processor type and features > Preemption Model
Use the next three commands to compile and build a deb package.
Downloads/4.16.18/linux-4.16.18/
1 make -j`nproc`
2 make modules -j`nproc`
3 make -j`nproc` bindeb-pkg
Finally install the packages using dpkg, they will be located up one directory.
Downloads/4.16.18/linux-4.16.18/
1 dpkg -i \
2 ../linux-headers-4.16.18-rt12_4.16.18-rt12-1_amd64.deb \
3 ../linux-image-4.16.18-rt12_4.16.18-rt12-1_amd64.deb \
4 ../linux-libc-dev_4.16.18-rt12-1_amd64.deb
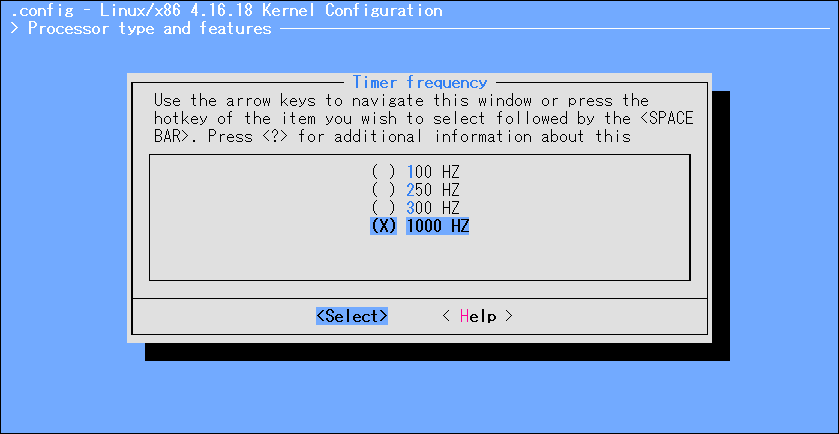
Timer Frequency
Increasing the interrupt timer frequency to 1000Hz can improve the overall latency and response of the system with the downsides of slightly decreasing throughput and increased power consumption. Doing this also requires changing the kernel configuration and re-compiling the kernel.
This option can be found in the following menu tree of the kernel configuration:
Processor type and features > Timer Frequency
References
https://www.kernel.org/doc/Documentation/vm/hugetlbpage.txt
The Kernel Development Community. The kernel’s command-line parameters.
https://www.kernel.org/doc/html/v4.14/admin-guide/kernel-parameters.html
Robert M. Love. (2014). taskset - set or retrieve a process's CPU affinity.
https://manpages.debian.org/testing/util-linux/taskset.1.en.html
Robert M. Love & Karel Zak. (2016). chrt - manipulate the real-time attributes of a process.
https://manpages.debian.org/testing/util-linux/chrt.1.en.html
SUSE. (2018). Tuning the Task Scheduler.
https://doc.opensuse.org/documentation/leap/tuning/html/book.sle.tuning/cha.tuning.taskscheduler.html
Alex Tsariounov. (2011). cset-shield - cpuset supercommand which implements cpu shielding.
https://manpages.debian.org/jessie/cpuset/cset-shield.1.en.html