Cherry MX Mechanical Keyboard Design Cheat Sheet
2021.01.28 | Yuki ReaThis is a compilation of useful information and tidbits to help with designing Cherry MX keyboard PCBs and cases. I have created my own notebook with some of this commonly used information and decided it would be best to put it all in one easily accessible place. Check back in the future, this post may grow as I add more and more information!
Switch Spacing
Most keyboards use a key spacing of 19.05mm center to center for 1u switches. Some however may be designed with a key spacing of 19mm if designed with metric measurements to make things easier. If you are designing a PCB or case to fit an existing case, be sure to take note of which key spacing the original uses. Over an entire keyboard the 0.05mm per key will add up quickly.
To find the correct spacing between switches of different size, you must use the formula below.
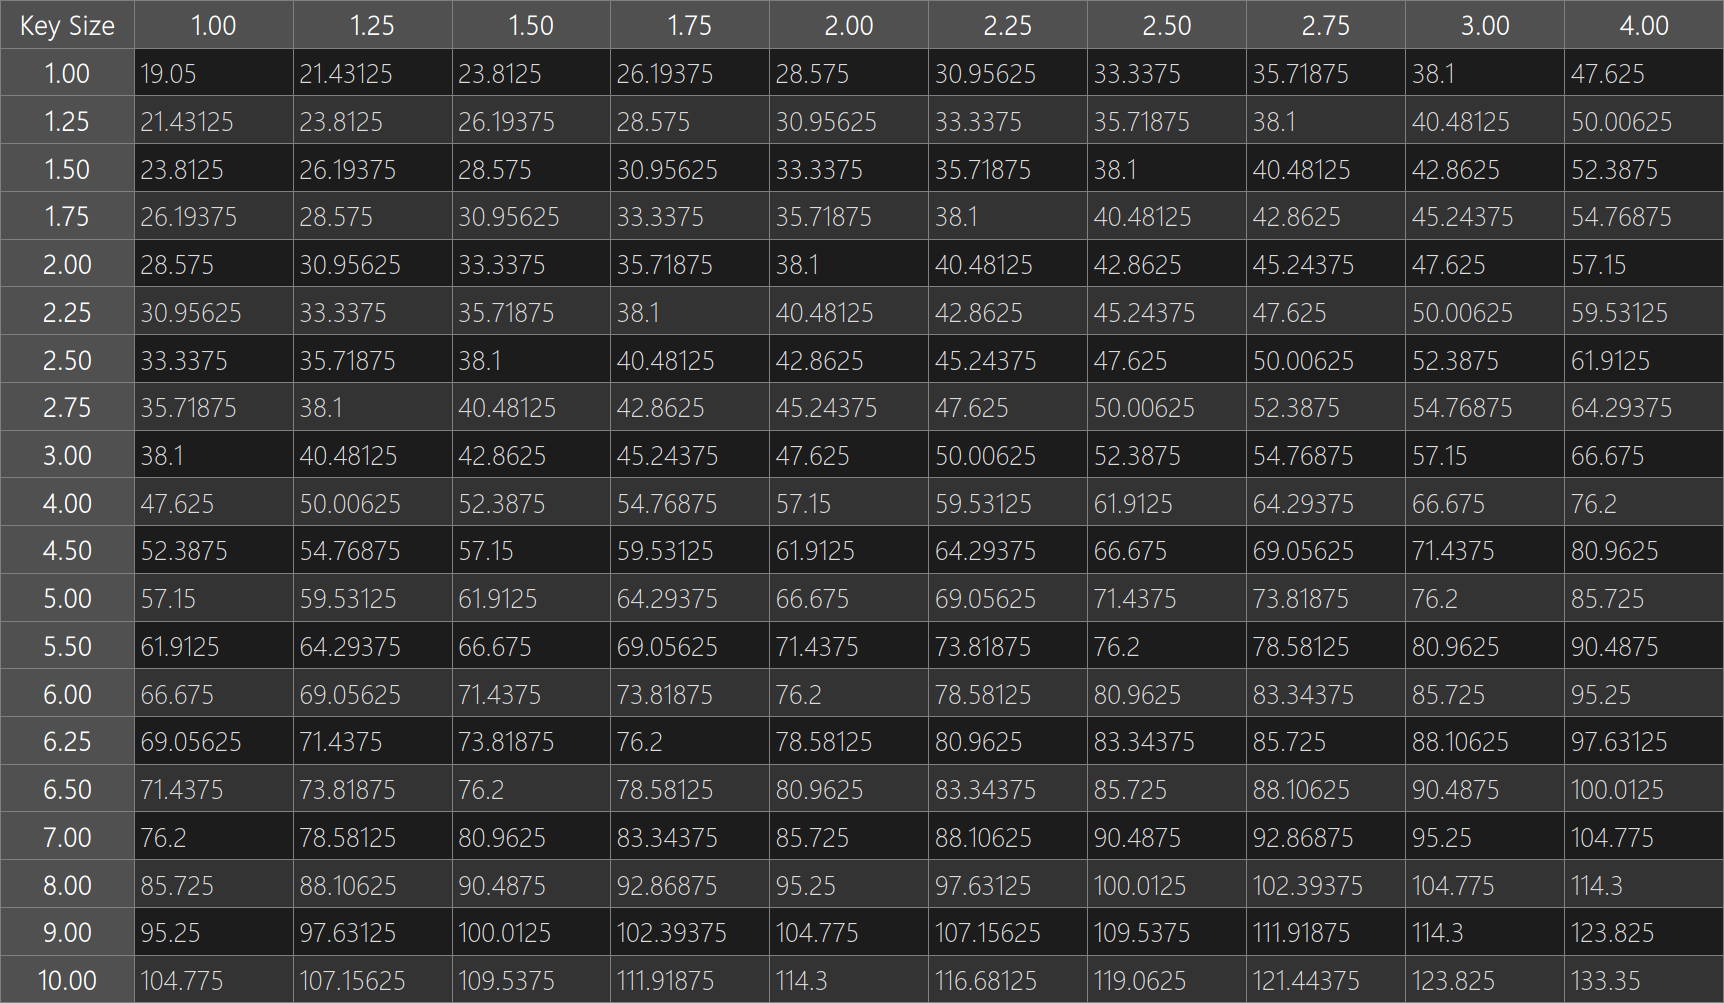
Below the formula is a table which can be used to lookup the spacing between 2 keys on a keyboard with 19.05mm unit size. Key Size in "Units" and distance measurements in "Millimeters center to center"
Formula
2 x * (y + z) / 2
3
4 x = 1u spacing (19.05mm)
5 y = size of switch 1 in units
6 z = size on switch 2 in units
7
Example, distance between 2.25u [Shift] and 1u [Z]
9 19.05mm * (2.25u + 1u) / 2 = 30.95625mm

PCB Mount Stabilizer Dimensions and Positioning
Most keycaps which use stabilizers have the same spacing even between different keycap sizes. If the stabilizer footprint is created with the dimensions listed below, each stabilizer can be placed at the same Y coordinate as the Cherry switch and offset only in the X direction. The exception to this is large space bars. For space bars, I recommend measuring the distance between the cherry stem hole and stabilizer stem hole of the keycap to get an accurate dimension as they vary quite a bit between manufacturers. Some manufacturers also so not center the stabilizers under the spacebar and have an offset Cherry switch.
Large mounting hole diameter : 3.9878Small mounting hole diameter : 3.048mm
Spacing from footprint origin to large hole : 8.415mm
Spacing from footprint origin to small hole : 6.985mm
X offset to Cherry switch : 11.938mm
Mounting Plate Dimensions
Plate dimensions are pretty simple, but can be a large problem if you don't think about them beforehand. The production process and material choice will determine the tolerances necessary for your application. When 3D printing a case with integrated plastic mounting plate, it may be necessary to oversize the holes if your printer is not perfectly calibrated to produce dimensionally accurate holes. Dimensional accuracy in regards to hole size is unforgiving, an undersized hole will cause too much pressure on the MX switch and cause the stems to bind up and stick depressed. Plate thickness is more forgiving, oversized plate thickness may be used to increase stiffness of the keyboard, especially in applications where plastics are used instead of metal for the mounting plate. An oversized plate will result in the MX switches not clipping into the plate, they will require another retaining method such as glue or a spacers between a PCB and plate to keep everything tight.
Plate Hole Size : 14mm x 14mm +- 0.1mmPlate Thickness : 1.5mm +- 0.1mm